PA Provider Deployment Guide: Difference between revisions
m (Choeger moved page POAIntegrationGuide to POA Provider Deployment Guide) |
|
(No difference)
| |
Revision as of 12:20, 23 October 2013
Open-Xchange HE + Parallels Operations Automation - Integration Instructions
This document covers the basic installation and configuration instructions to integrate an OpenXchange Server into a POA environment. It does not cover any OX setup tuning instructions. It should be used by POA or/and OX specialists since this configuration instructions require a very deep knowledge of both products.
Terms and Abbreviations
- APS
- Application Packaging Standard
- PBA
- Parallels Business Automation.
- POA
- Parallels Operations Automation.
- RST
- Resource Type
- RS
- Resource
- ST
- Service Template
Download
Download the APS package from the APS catalogue
Requirements
The APS Package requires POA 5.0 or higher, Plesk 11.5 or higher and Open-Xchange 6.22.3 or higher / OX App Suite 7.2.1 or higher.
Changelog
7.2-26
- Fixed OX6 gui preferences merging
7.2-25
- Added all available timezones in OX App Suite and removed the static time zone designators from the entries
7.2-24
- Fixed debug logging
- Do not use the obsolete syncml setting anymore in combination with "Mobile devices support"
7.2-20
- Fixed displayname uniqueness check
7.2-19
- Fix loginMapping in getContextWithId and context Id in getContextData
7.2-18
- Ability to change admin user login
7.2-14
- since primary mail setting cannot be changed directly, setting has been removed
- eleminated more php warnings
7.2-9
- Added note to Horde migration setting that it does not work on Plesk
- Shortened the presentation summary
- reduced warnings in php code
7.2-6
- Increasing filestore_quota via resource now possible
7.2-5
- Fixed problem with POA versions > 5.5 and public contact folder
- Increased default upload size values of attachments and infostore
- Bugfix: Disabling a user now working
7.2-1
- Reseller Mode for Plesk
- Ready for Plesk 11.5 and above
- No support for Open-Xchange Version 6.20 anymore
7.0-10
- Fixed issue with creating resource types based on application service
7.0-7
- Bugfix when using Open-Xchange with Grizzly instead of AJP
- Added translations for various languages
7.0-4
- Public entry point added in top service
- Reporting mailbox password into user_password setting
- Context ID is not stored in file
7.0-2
- First version with support for latest Open-Xchange versions such as 6.22.2 and OX App Suite
- Added support for dutch language provisioning
- Due to compatibility reasons the account entry points have been reduced to one auto-login entry-point into Open-Xchange
- replaced deprecated php split with explode in configuration scripts
- added optional tag to optional settings in account service settings
OX Deployment
Simply follow the "Hosting Edition deployment tutorials" at Main_Page_HESE#quickinstall to install Open-Xchange Hosting Edition on your favorite Linux distribution, but make sure you install the packages below instead of the default OX meta/packages provided in the manual, because POA integration needs a different set of software:
mysql-server open-xchange-meta-parallels
Important: Stop before step "Creating contexts and users " - this is not necessary since all administration of contexts and users will be handled via POA.
Installation and Configuration of OX Business Mobility
If you plan to sell Open-Xchange Business Mobility function (synchronization with mobile phones) in combination with POA, you should also follow the official installation guide, which can be found also on the OXPedia website:
Business Mobility Installation
Installation and Configuration of SOAP interface
To allow POA to provision contexts and users to Open-Xchange it is necessary to install the SOAP package on the OX server and configure it:
1. Login to your Open-Xchange server and install the package open-xchange-admin-soap
2. Restart the Open-Xchange services:
$ /etc/init.d/open-xchange restart
Installation of POA specific OX plugins
Please install following packages on the OX server if not already done by the meta package specified above. These are mandatory for the POA integration:
open-xchange-parallels open-xchange-parallels-gui open-xchange-spamhandler-spamassassin open-xchange-admin-soap
IMPORTANT: Make sure that you don't have any other „spamhandler“ package installed like „open-xchange-spamhandler-default“. Also make sure, that you dont have any other OX authentication package installed like „open-xchange-authentication-database“. Additionally, don't install following packages, since they are not needed for POA installation:
open-xchange-admin-plugin-contextrestore, open-xchange-log4j, open-xchange-passwordchange-database, open-xchange-passwordchange-servlet
If already installed, please uninstall first!
These packages contain POA specific plugins for authentication, branding and advanced antispam cababilities. After you installed these packages via your favorite package manager like apt or yum, please restart the open-xchange server. To verify that the plugins are correctly loaded, please execute the command „listbundles“ which is located in /opt/open-xchange/sbin“. It should return a list with all „ACTIVE“ bundles.
If the bundle „com.openexchange.custom.parallels“ is not set to „ACTIVE“, please have a look at all OX logfiles located under „/var/log/open-xchange“ and watch out for error messages.
Configuration of POA specific OX plugins
In /opt/open-xchange/etc/sessiond.properties set
com.openexchange.sessiond.autologin=true
If not, users will get the message The action "store" is disabled due to server configuration when they directly access Open-Xchange via POA.
In /opt/open-xchange/etc/login.properties add the new setting
com.openexchange.login.formLoginWithoutAuthId=true
In /opt/open-xchange/etc/plugin/hosting.properties set
CHECK_CONTEXT_LOGIN_MAPPING_REGEXP=[$%:\\.+a-zA-Z0-9@_\\/\\|-]
In /opt/open-xchange/etc/AdminUser.properties set
PRIMARY_MAIL_UNCHANGEABLE=false
a) To enable the OX-POA antispam functionality you must first edit file „/opt/open-xchange/etc/imap.properties“ and set property „com.openexchange.imap.spamHandler“ to value „SpamAssassin“.
# Define the registration name of the appropriate spam handler to use
com.openexchange.imap.spamHandler=SpamAssassin
Next you have to edit file „/opt/open-xchange/etc/spamassassin.properties“ and set property „com.openexchange.spamhandler.spamassassin.spamd“ to value „true“.
# Choose if a mail should be send to spamd afterwards
com.openexchange.spamhandler.spamassassin.spamd=true
INFO:
If POA XML-RPC Service runs on a different port than „3100“.
Please edit file:
"/opt/open-xchange/etc/parallels.properties"
and set property
"com.openexchange.custom.parallels.antispam.xmlrpc.port" to your custom port.
Make sure that the OX HOST IPs are added to "/etc/mail/spamassassin/allowed_ips" on the POA antispam/mail server. Else OX can not connect to POA spamassasin to learn new mails and you will get "connection reset" errors in open-xchange logfile.
2a) To configure POA antispam lists management via OX UI through POA-OpenAPI, you have to modify "/opt/open-xchange/etc/parallels.properties" and should adjust following parameters:
#
## OpenAPI properties for managing Black&White Lists via OX GUI
#
# This property defines the URL to the HTTP OpenAPI interface of POA
com.openexchange.custom.parallels.openapi.interface_url=http://<coreserver>:<port>/

#
# This property defines if OpenAPI calls should be made with http basic auth
com.openexchange.custom.parallels.openapi.auth_enabled=false

#
# This property defines OpenAPI http basic auth credentials auth id
com.openexchange.custom.parallels.openapi.auth_id=openapi_user_id

#
# This property defines OpenAPI http basic auth credentials auth password
com.openexchange.custom.parallels.openapi.auth_password=openapi_password

#
# The property defines the mount point of the OX OpenAPI servlet implementation.
# Typically, no need to change it.
com.openexchange.custom.parallels.openapi_servlet=/ajax/parallels/openapi
b) To enable correct branding for POA resellers and their customers, you have to define a „fallback“ FQDN under which the OX installation is reachable under the default skin/theme via http/https.
To achieve this, please edit file „/opt/open-change/etc/parallels.properties“ and set property „com.openexchange.custom.parallels.branding.fallbackurl“ to the approciate value of your OX installation.
# THIS property below must only contain FQDN to OX GUI
# like webmail.system.com/ox6
com.openexchange.custom.parallels.branding.fallbackurl=ox.aps.sw.ru
c)To enable correctly generated direct links when customer/context is branded you have to edit file „/opt/open-xchange/etc/notification.properties“ and set property „object_link“ to value „http://[hostname]/#m=[module]&i=[object]&f=[folder]“
object_link=http://[hostname]/#m=[module]&i=[object]&f=[folder]
d) To support IDN Domains you also have to switch off username validation. To achieve this, please modify file "/opt/open-xchange/etc/AdminUser.properties" and update corresponding property:
CHECK_USER_UID_FOR_NOT_ALLOWED_CHARS=false
e) The Open-Xchange SOAP interface is used by POA to provision the OX system. To restrict access to this interface, we recommend that you add following lines to the apache2 configuration of OX (/etc/apache2/conf.d/ox_soap_access.conf).
The following example configuration will allow SOAP requests only from "localhost" and IP address "172.16.65.1". Make sure you edit this configuration accordingly to your actual POA environment/network. If you dont know the IP address of the POA host which will use the SOAP interface, contact the POA specialist who is responsible for the project. If you need more fine grained access restrictions see "mod_access" documentation at www.apache.org.
<Location /servlet/axis2/services>
Order Deny,Allow
Deny from all
Allow from 172.16.65.1 127.0.0.1
</Location>
After you have edited all these properties, please restart „open-xchange" and apache service via init scripts. Now you need to write down the „oxadminmaster“ username and its password which you set up during installation of the normal OX system. Then you should give these credentials and the OX IP/Hostname to the POA specialist. He will enter this infos in the POA environment.
POA Deployment
Creating 'External Provisioning' Attribute
Create the External Provisioning Attribute.
Deploying POA Linux Mail Hosting Module
Deploy the POA Linux Mail Hosting Module using the instructions provided in the POA Linux Mail Hosting Deployment Guide.
- The Linux Mail Hosting Module supports the CourierIMAP and Dovecot POP/IMAP Services (the last one is recommended to work with Open-Xchange).
- If you plan to provide to customers the ability to manage the Sieve mail filtering rules through Open-Xchange Control Panel, install the latest version of the dovecot (type: other) POA Package instead of the CourierIMAP (type: other) POA Package. If the existing installation of Linux Mail Hosting Module is used, perform the migration from Courier-IMAP Service to Dovecot POP/IMAP Service. Instructions how to perform the migration are provided in the POA Linux Mail Hosting Deployment Guide, the Deploying Linux Mail Hosting > Migrating from Courier-IMAP Service to Dovecot Service section.
- If you plan to provide to customers the ability to manage the Sieve mail filtering rules through Open-Xchange Control Panel and Clustered QMail Service is used as SMTP/IMAP server for Open-Xchange, add the load balancing rule for TCP port 2000 on Load Balancer. See the POA Linux Mail Hosting Deployment Guide, the Deploying Linux Mail Hosting > Deploying Clustered Qmail Service > Creating Load Balancer section for details.
- It is not required to deploy the IMP and AtMail Webmail Services. 5. The SpamAssassin and DrWeb Services are optional.
Create the Resource Types, which are required for Linux Mail Hosting provisioning
- CQMail Hosting Resource Type. Use the instructions provided in POA Provider's Guide, the Mail Hosting in POA > Creating 'CQMail Hosting' Resource Type section.
- SpamAssassin Protection. Create the SpamAssassin Protection Resource Type on the basis of the Antispam for mailboxes Resource Class. Instructions on how to do this, are provided in Provider's Guide, the Managing Service Templates > Creating Resource Type section.
- Traffic. Create the Traffic Resource Type on the basis of the Traffic Resource Class. Instructions on how to do this, are provided in Provider's Guide, the Managing Service Templates > Creating Resource Type section.
- Diskspace. Create the Diskspace Resource Type on the basis of the Diskspace Resource Class. Instructions on how to do this, are provided in Provider's Guide, the Managing Service Templates > Creating Resource Type section.
Mark the host where clustered-qmail service is installed as Ready To Provide.
Note: Already existing in POA Linux Mail Hosting Module can also be used for deployment.
Preparing Provisioning Gateway Host
- Install php-cgi
- The Application management scripts are contained in the Application package. POA installs Application the management scripts on this host.
- The management scripts provision the Open-Xchange server via http using the SOAP protocol and thus. the Open-Xchange server must be accessible from the provisioning host using these protocols.
- Assign the External Provisioning Attribute to the Provisioning Gateway Host.
- Mark the Provisioning Gateway Host as Ready To Provide.
Import the Application
Deploy the application from the APS catalogue.
APS Package Resource configuration
- Click on Add New Resource Type in Top > Service Director > Provisioning Manager > Resource Types.
- Click on the Application Resource class
- Set a name and description
- Select the Open-Xchange from the list of applications
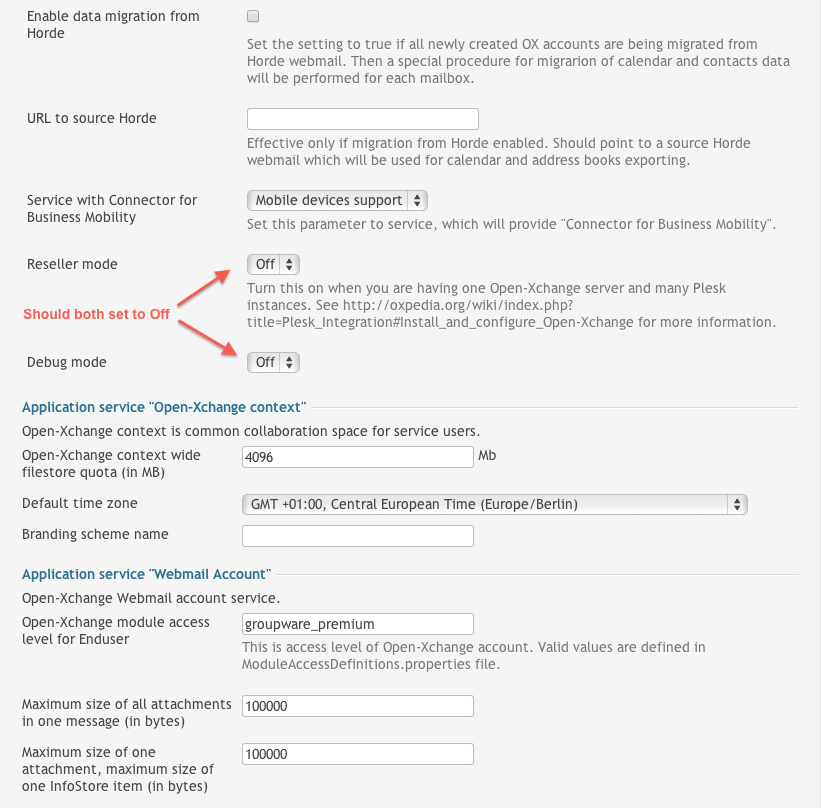
- Fill the Global application settings (see below)
- Set the "External Provisioning" attribute
Global application settings
- Open-Xchange installation host
- DNS hostname or ip address of the Open-Xchange provisioning host (will be accessed via SOAP)
- Open-Xchange public site URL
- The URL on how to access Open-Xchange Webmail
- Product path to access Open-Xchange
- Chose the product path depending on your configuration. On OX App Suite, this is /appsuite/ per default, on OX6, it is /ox6/. Note that the trailing "/" is mandatory.
- Open-Xchange Autologin identifier
- Chose either OX App Suite or OX6
- Master Administrator Login
- OX provisioning account with rights to create contexts
- Master Administrator Password
- Password of provisioning account
- Open-Xchange administrator access level
- The access level of the context admin account. Check /opt/open-xchange/etc/ModuleAccessDefinitions.properties for a list of possible values. Should be a permissive value like groupware_premium in order for the admin to be able to manage all features.
- Open-Xchange anti-spam protection interface
- It defines whether the spam reporting functionality is enabled. If it is enabled, the Open-Xchange context user is able to mark messages as spam/not spam. Make it enabled. Note that this does not yet work in OX App Suite.
- Public contacts folder
- Public folder to place contacts of non Open-Xchange service users into. Not to confuse with the standard public contacts folder in Open-Xchange where every OX mail account is listed.
- Enable data migration from Horde
- Enable if you want to migrate data from an existing Horde installation.
- URL to source Horde
- Provide URL to Horde Webmail. Will be used only if data migration is enabled in previous setting.
- Service with Connector for Business Mobility
- Reseller mode
- This should be Off in most cases when in use with POA. Makes sense in Plesk deployment, see Plesk_Integration
- Debug mode
- Should be Off per default.
Application service "Open-Xchange context"
- Open-Xchange context wide filestore quota (in MB)
- Specify the overall size that can be used to store files in the Open-Xchange context
- Default time zone
- Specify the default timezone for new users
- Branding scheme name
- The name of the Open-Xchange theme which is applied to the context user. If the parameter is not specified, the default Open-Xchange theme is used.
Application service "Webmail Account"
- Open-Xchange module access level for Enduser
- Specify the access level of a webmail user. Check /opt/open-xchange/etc/ModuleAccessDefinitions.properties for a list of possible values.
- Maximum size of all attachments in one message (in bytes)
- Specify "0" for unlimited
- Maximum size of one attachment, maximum size of one InfoStore item (in bytes)
- Specify "0" for unlimited
Note: For an overview of the different supported access levels, see OX_Permission_Level.
OX App Suite or OX 6
Depending on whether you plan to integrate OX App Suite or OX 6, you have to select the correct identifier.
Running OX App Suite and OX 6 in parallel
On a parallel setup of OX App Suite and OX6 you may want to access both from you POA. This can be achieved in creating two resource types in the POA Provisioning Manager. One for OX App Suite and one for OX 6. In the Product path setting, you can either specify the path to OX App Suite or to OX6
Note: Do not configure an automatic redirect/url rewrite in this case.
Create some Resource Types based on Application Service
Now you could create two Resource Types for a Basic and a Pro account.
Basic Resource Type
- Click on Add New Resource Type in Top > Service Director > Provisioning Manager > Resource Types
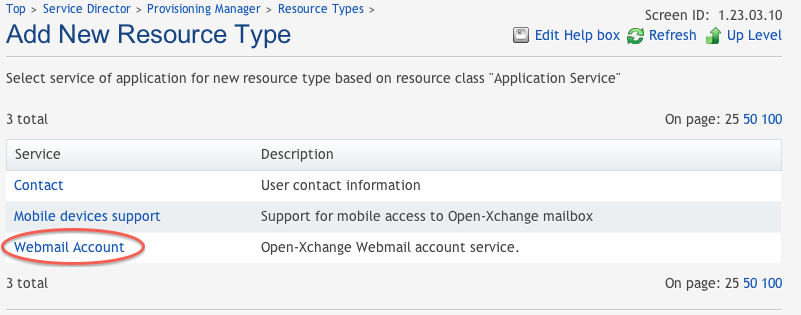
- Chose Application Service
- Fill out name and description
- Select Open-Xchange Application
- Select Webmail Account
- Enter groupware_standard as access level
File:Basic-groupware standard.png
Pro Resource Type
- Fill out name and description, use "Pro" in this case
- Select Open-Xchange Application
- Select Webmail Account
- Enter groupware_premium as access level
- You might also want to use higher values for the upload limits
File:Pro-groupware premium.png
Create a Resource Type based on Application Resource
- Click on Add New Resource Type in Top > Service Director > Provisioning Manager > Resource Types
- Chose Application Resource
- Fill out name and description
- Select Open-Xchange Application
- Click on Disk space used by Open-Xchange context infostore files
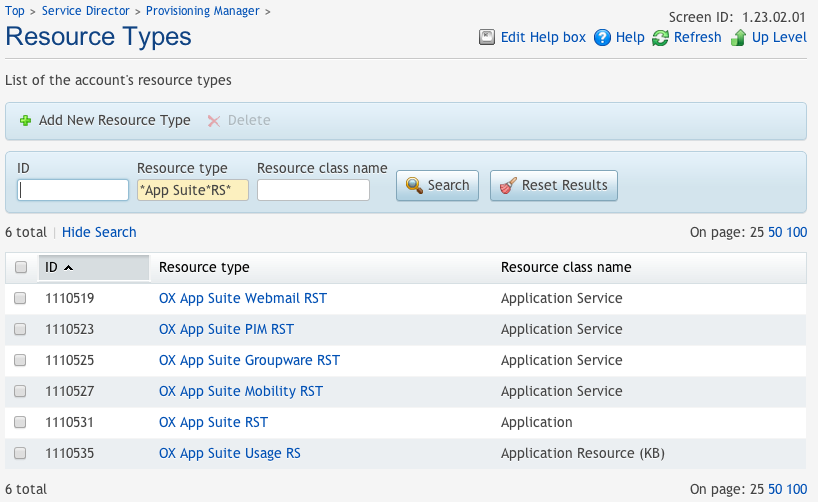
At the end, you should have four Resource Types:
Create a Service Template
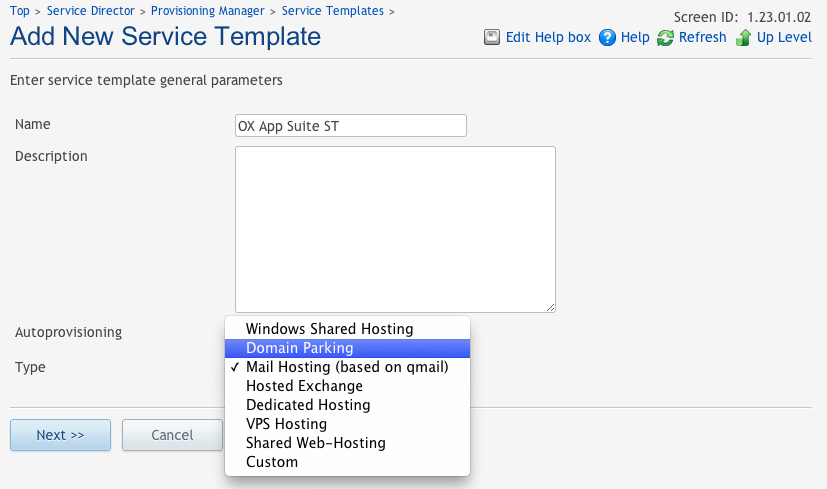
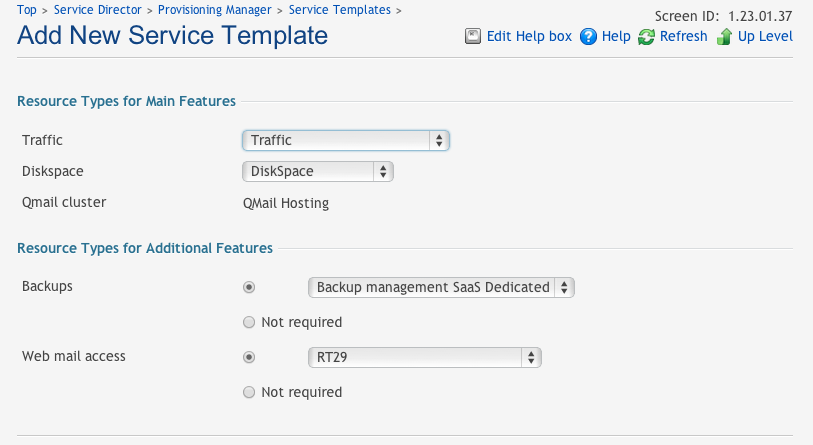
- Click on Add New Service Template in Top > Service Director > Provisioning Manager > Service Templates
- Fill out name and description
- Select Mail Hosting (based on qmail).
- Select a proper Traffic and Diskspace Resource Type
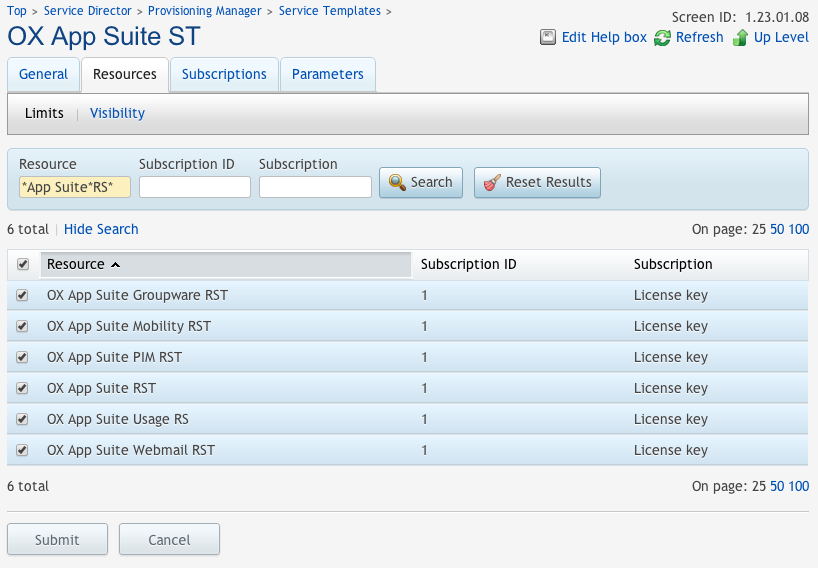
- Now add further Resource Types to the new Service Template
- Find an add all four Resource Types that have been created earlier
- Do not use the Unlimited value for the Open-Xchange Context Diskspace resource. Use the limited values that are large enough. For example: 2 GB, 4 GB, and etc.
