OX HE Tutorial 100K: Difference between revisions
No edit summary |
No edit summary |
||
| Line 82: | Line 82: | ||
=== Connect Control Panel === | === Connect Control Panel === | ||
You need a Control Panel to create and edit users. OX is designed to integrate into every solution you may already have in place and into existing solutions, like the Parallels Control Panels | |||
==== Integrate your own Control Panel ==== | |||
If you want to integrate OX with your own control panel, it is recommended to use the SOAP provisioning Interface for that purpose. | |||
Read more about: {{DocLink|docpath=SOAP/admin/OX-Admin-SOAP.html|name=Provisioning using SOAP}} | |||
A good start to test and to understand the necessary commands are the Command Line Tools. They have exactly the same calls like the SOAP API. | |||
Read more about: {{DocLink|docpath=OX6-Provisioning/|name=Open-Xchange CLT}} | |||
==== Integrate with Parallels Automation (POA) ==== | |||
If you want to use POA to manage your users, there is an APS package available to integrate OX into the POA system. | |||
Read more in the: [[POAIntegrationGuide]] | |||
==== Integrate with Plesk Panel ==== | |||
If you want to use Plesk Panel to manage your users, there is an OXtender available to integrate OX into the Plesk Panel. | |||
Read more about the: [[Plesk_Oxtender]] | |||
=== Connect Email System === | === Connect Email System === | ||
Revision as of 22:15, 25 January 2011
Tutorial: High Available OX HE Deployment for up to 100.000 users
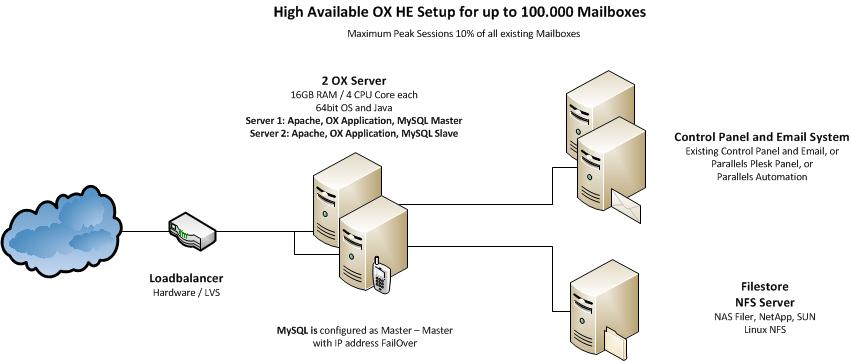
This article describes what you need for a typical OX HE Setup for up to 100.000 Users, which is fully clustered and high available.
It contains everything you need to:
- Understand the design of the OX HE setup including additional services
- Install the whole system based on the relevant articles
- Find pointers to the next steps of integration
System Design
The system is designed, to provide maximum functionality and availability with a minimum of necessary hardware. If the services on one server fail, it is enough to take over the IP address to the other machine and service will stay up and running.
Core Components for OX HE
- Two basic configured Open-Xchange HE servers (HW recommendation: 16GB RAM / 4 cores each)
- MySQL installed directly on these server
- NFS Server to store documents and files
Infrastructure Components not delivered by OX
- An email system providing IMAP and SMTP
- A control panel for creation and administration of users
- A Load Balancer in front of the OX servers (optional, recommended)
Overview Installation Steps
To deploy the described OX setup, the following steps need to be done.
Mandatory Steps
- Initialize and configure MySQL database on both servers
- Install and configure OX on both servers
Steps depending on your environment
- Implement Load Balancer
- Connect Control Panel
- Connect Email System
Recommended Optional Next Steps
- Automated Frontend Tests
- Upsell Plugin
- Mobile Autoconfiguration
- Automatic FailOver
- Branding
Installation Steps - Instructions & Recommendations
Mandatory Steps
The following steps need to be done in every case to get OX up and running:
Initialize and configure MySQL database on both servers
MySQL will run on both servers. MySQL will be configured as Master-Master configuration to ensure data consistency on both servers. If one machine fails, the other machine will take over all functionality.
LINK_TO_DOCU
Install and configure OX on both servers
OX will be installed on both servers. It will be configured to write to the first MySQL database and to read from the second MySQL database. This will distribute the load during normal operation as smooth as possible.
The NFS server will be mounted and registered as filestore.
LINK_TO_DOCU
Steps depending on your environment
The following components need to be implemented in your environment.
Implement Load Balancer
A load balancer in front of the OX servers is optional, but recommended. (In small environments, DNS Round Robin may be sufficient).
If you do not have a load balancing solution already in place, we recommend to use [[1]] as reliable and cost effective solution.
Read more about Keepalived
Connect Control Panel
You need a Control Panel to create and edit users. OX is designed to integrate into every solution you may already have in place and into existing solutions, like the Parallels Control Panels
Integrate your own Control Panel
If you want to integrate OX with your own control panel, it is recommended to use the SOAP provisioning Interface for that purpose.
Read more about: Provisioning using SOAP
A good start to test and to understand the necessary commands are the Command Line Tools. They have exactly the same calls like the SOAP API.
Read more about: Open-Xchange CLT
Integrate with Parallels Automation (POA)
If you want to use POA to manage your users, there is an APS package available to integrate OX into the POA system.
Read more in the: POAIntegrationGuide
Integrate with Plesk Panel
If you want to use Plesk Panel to manage your users, there is an OXtender available to integrate OX into the Plesk Panel.
Read more about the: Plesk_Oxtender
Connect Email System
Recommended Optional Next Steps
You will find plenty of additional documentation for customization of OX.
When the main setup is completed, we recommend to start with the following articles to enhance your system and to become more attractive for your users.
Automated Frontend Tests
It is a good idea, to verify the functionality of your freshly set up and integrated system. Our QA department does that with tests, running automatically on the web frontend. We release this tests with every release and recommend you to use them to verify your environment with every update.
Read more about Automated_GUI_Tests
